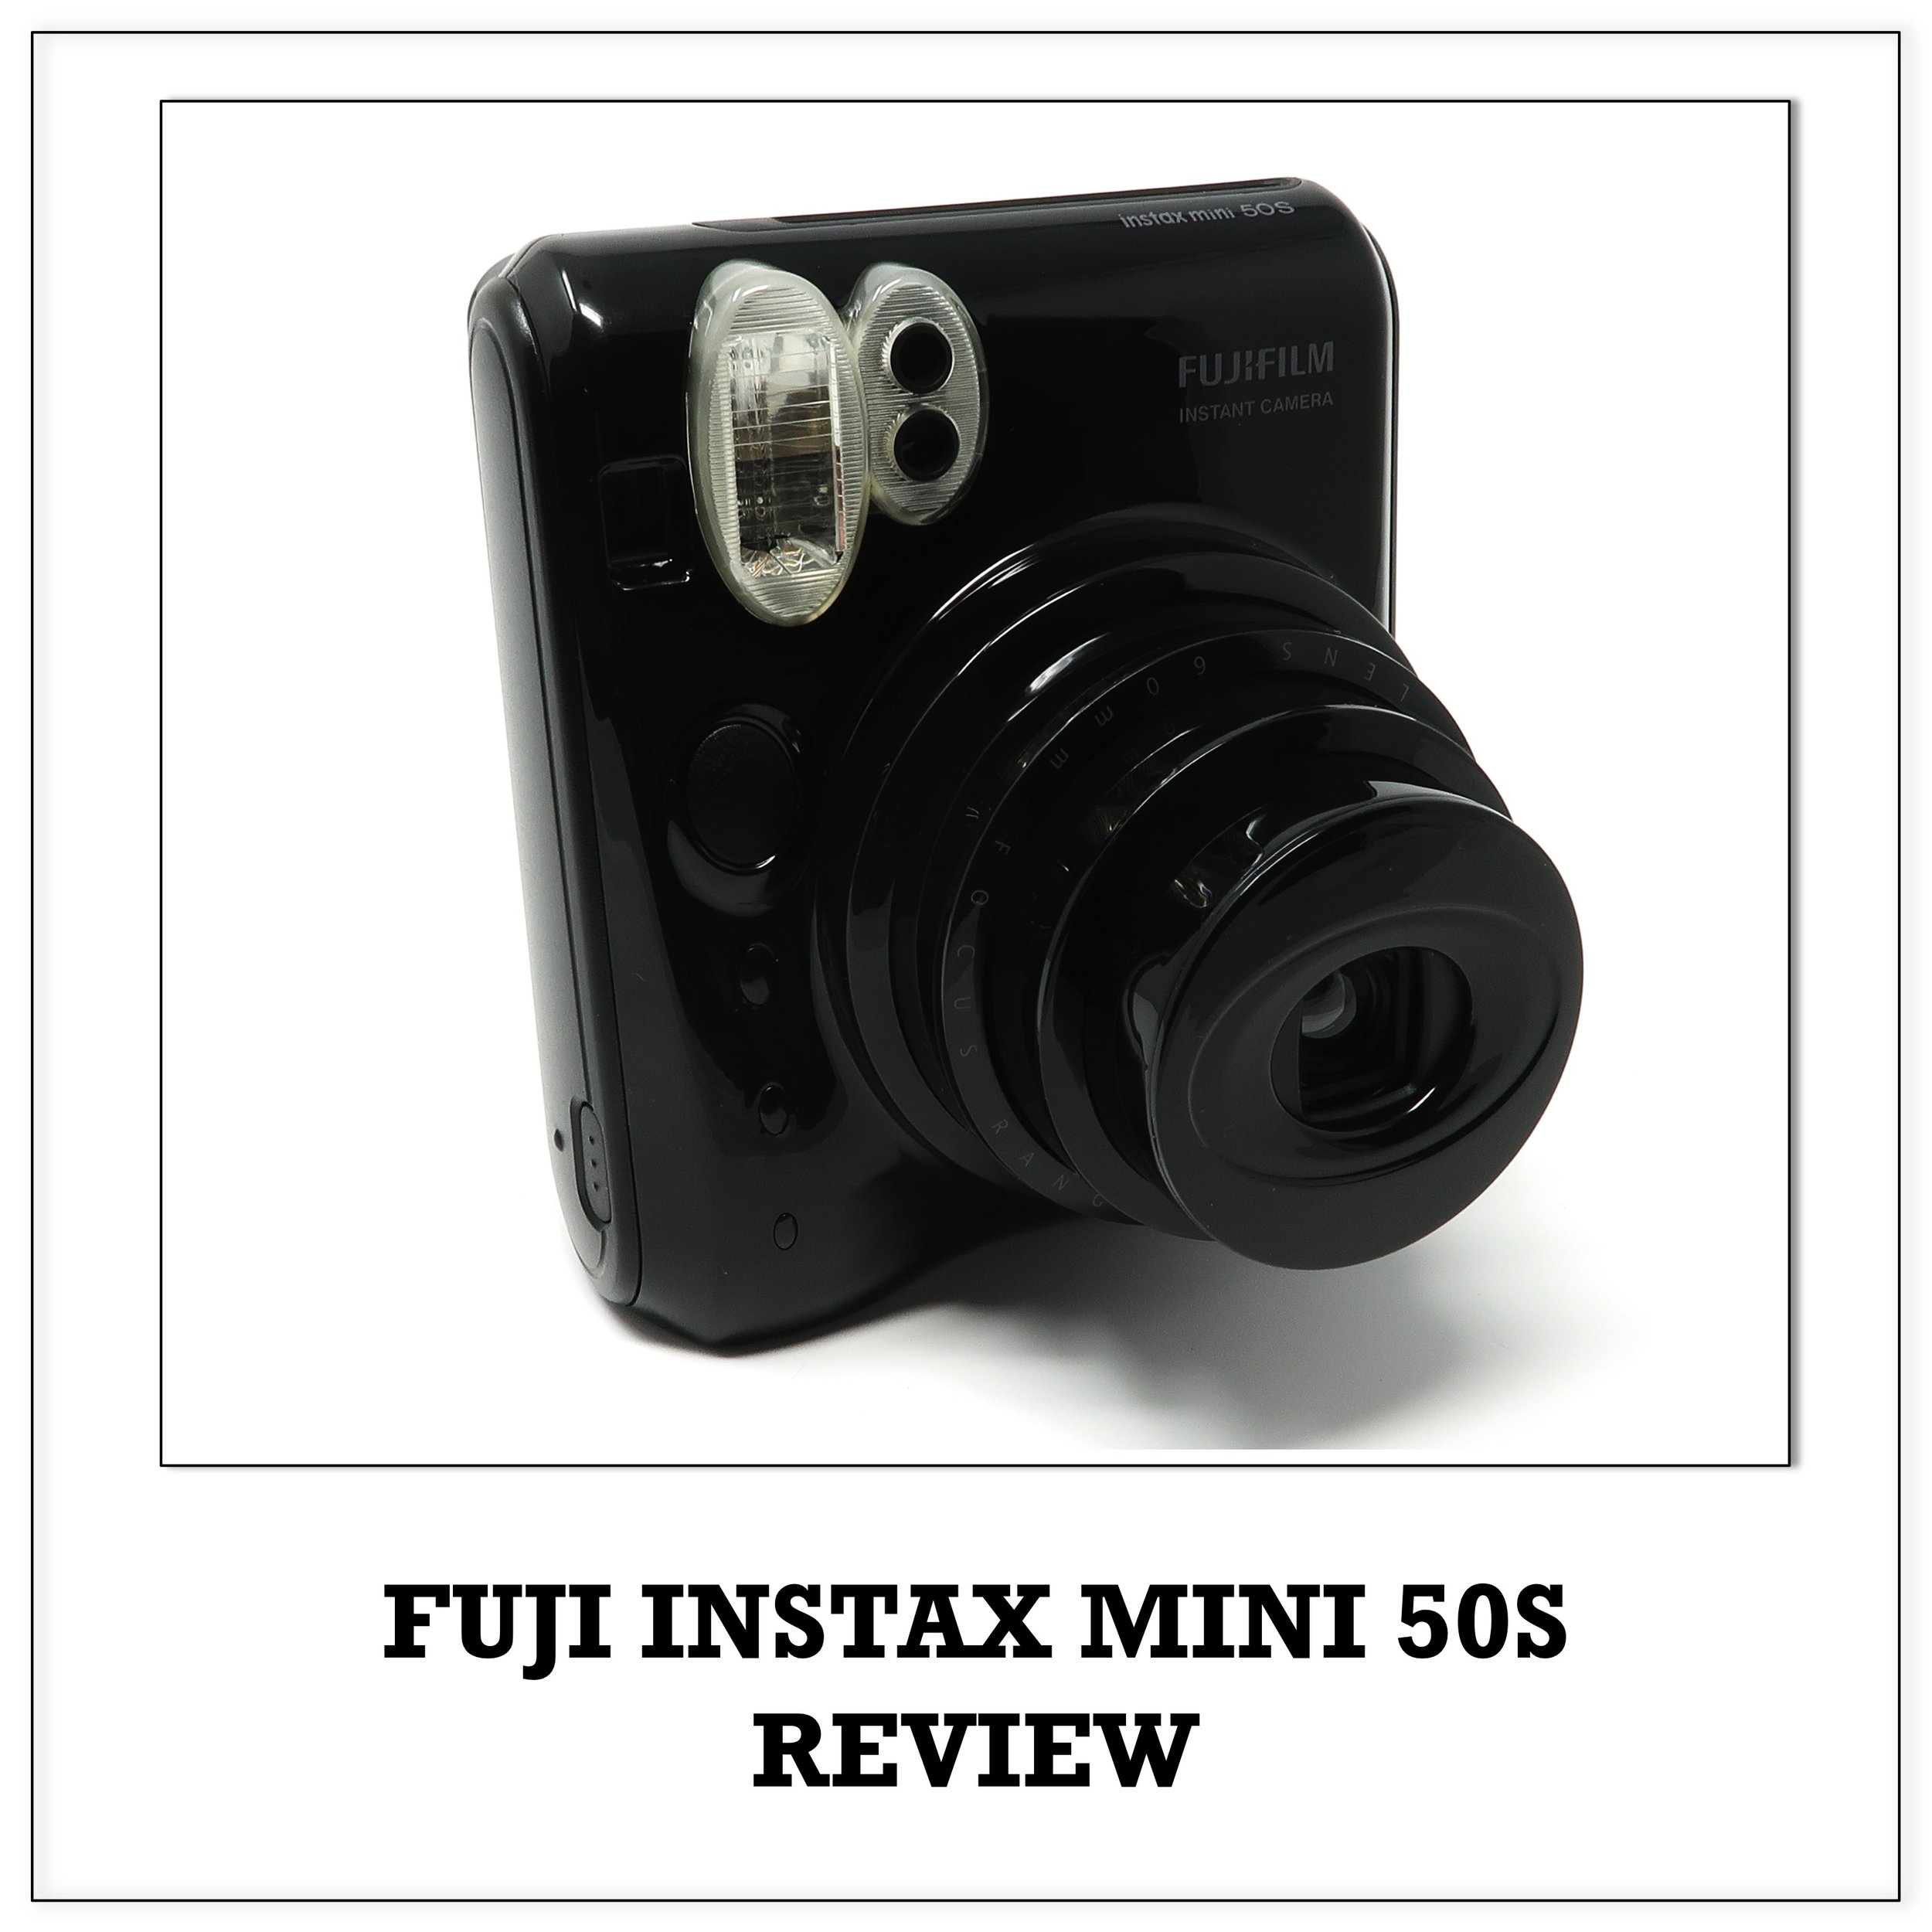
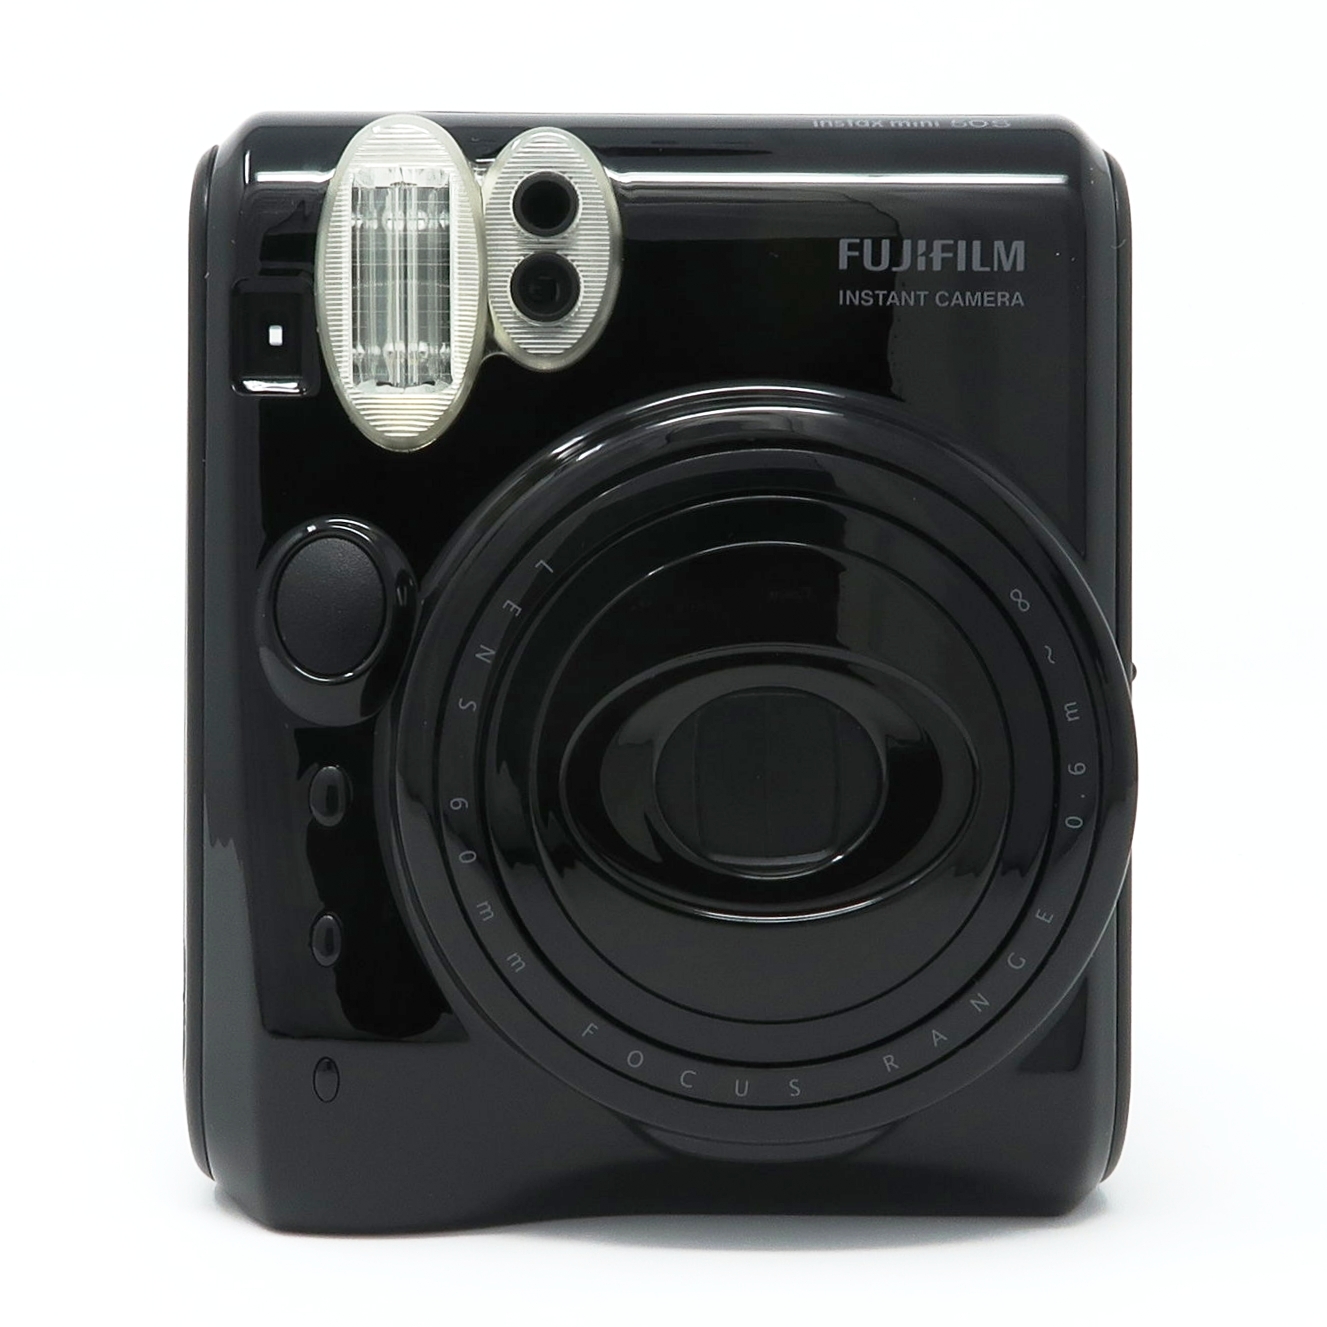
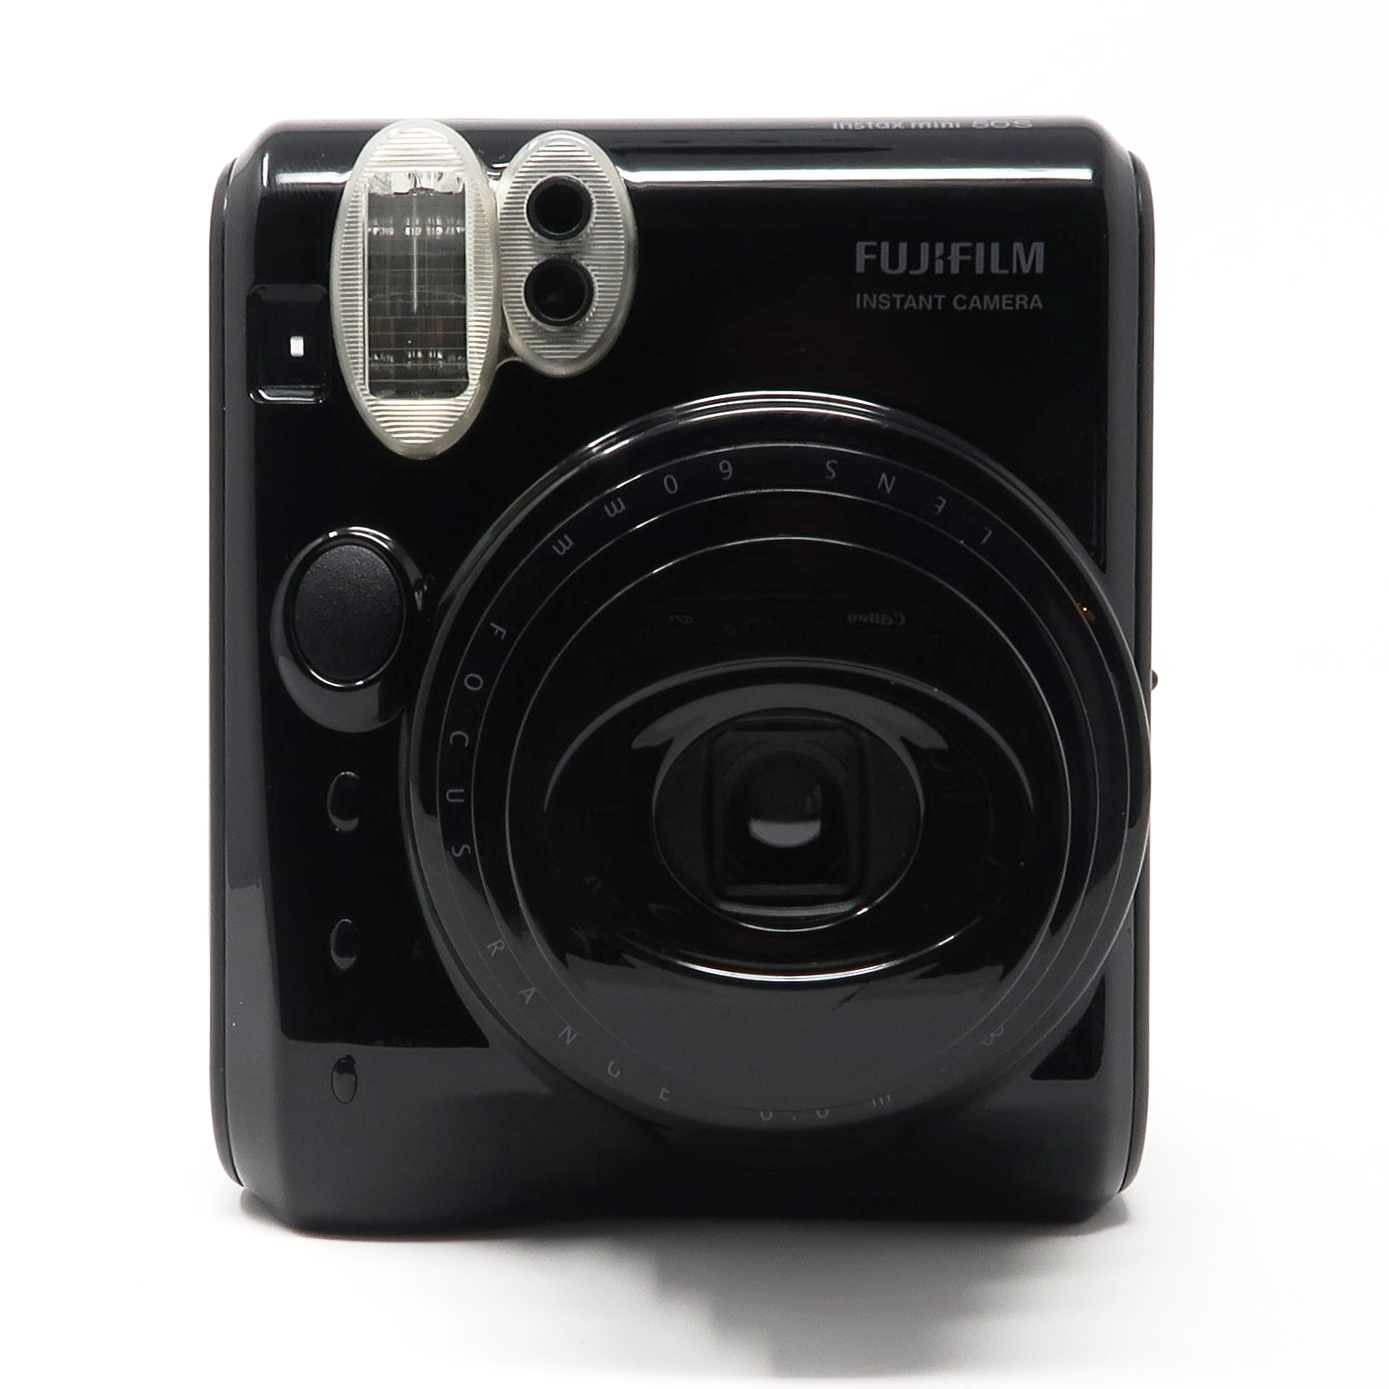
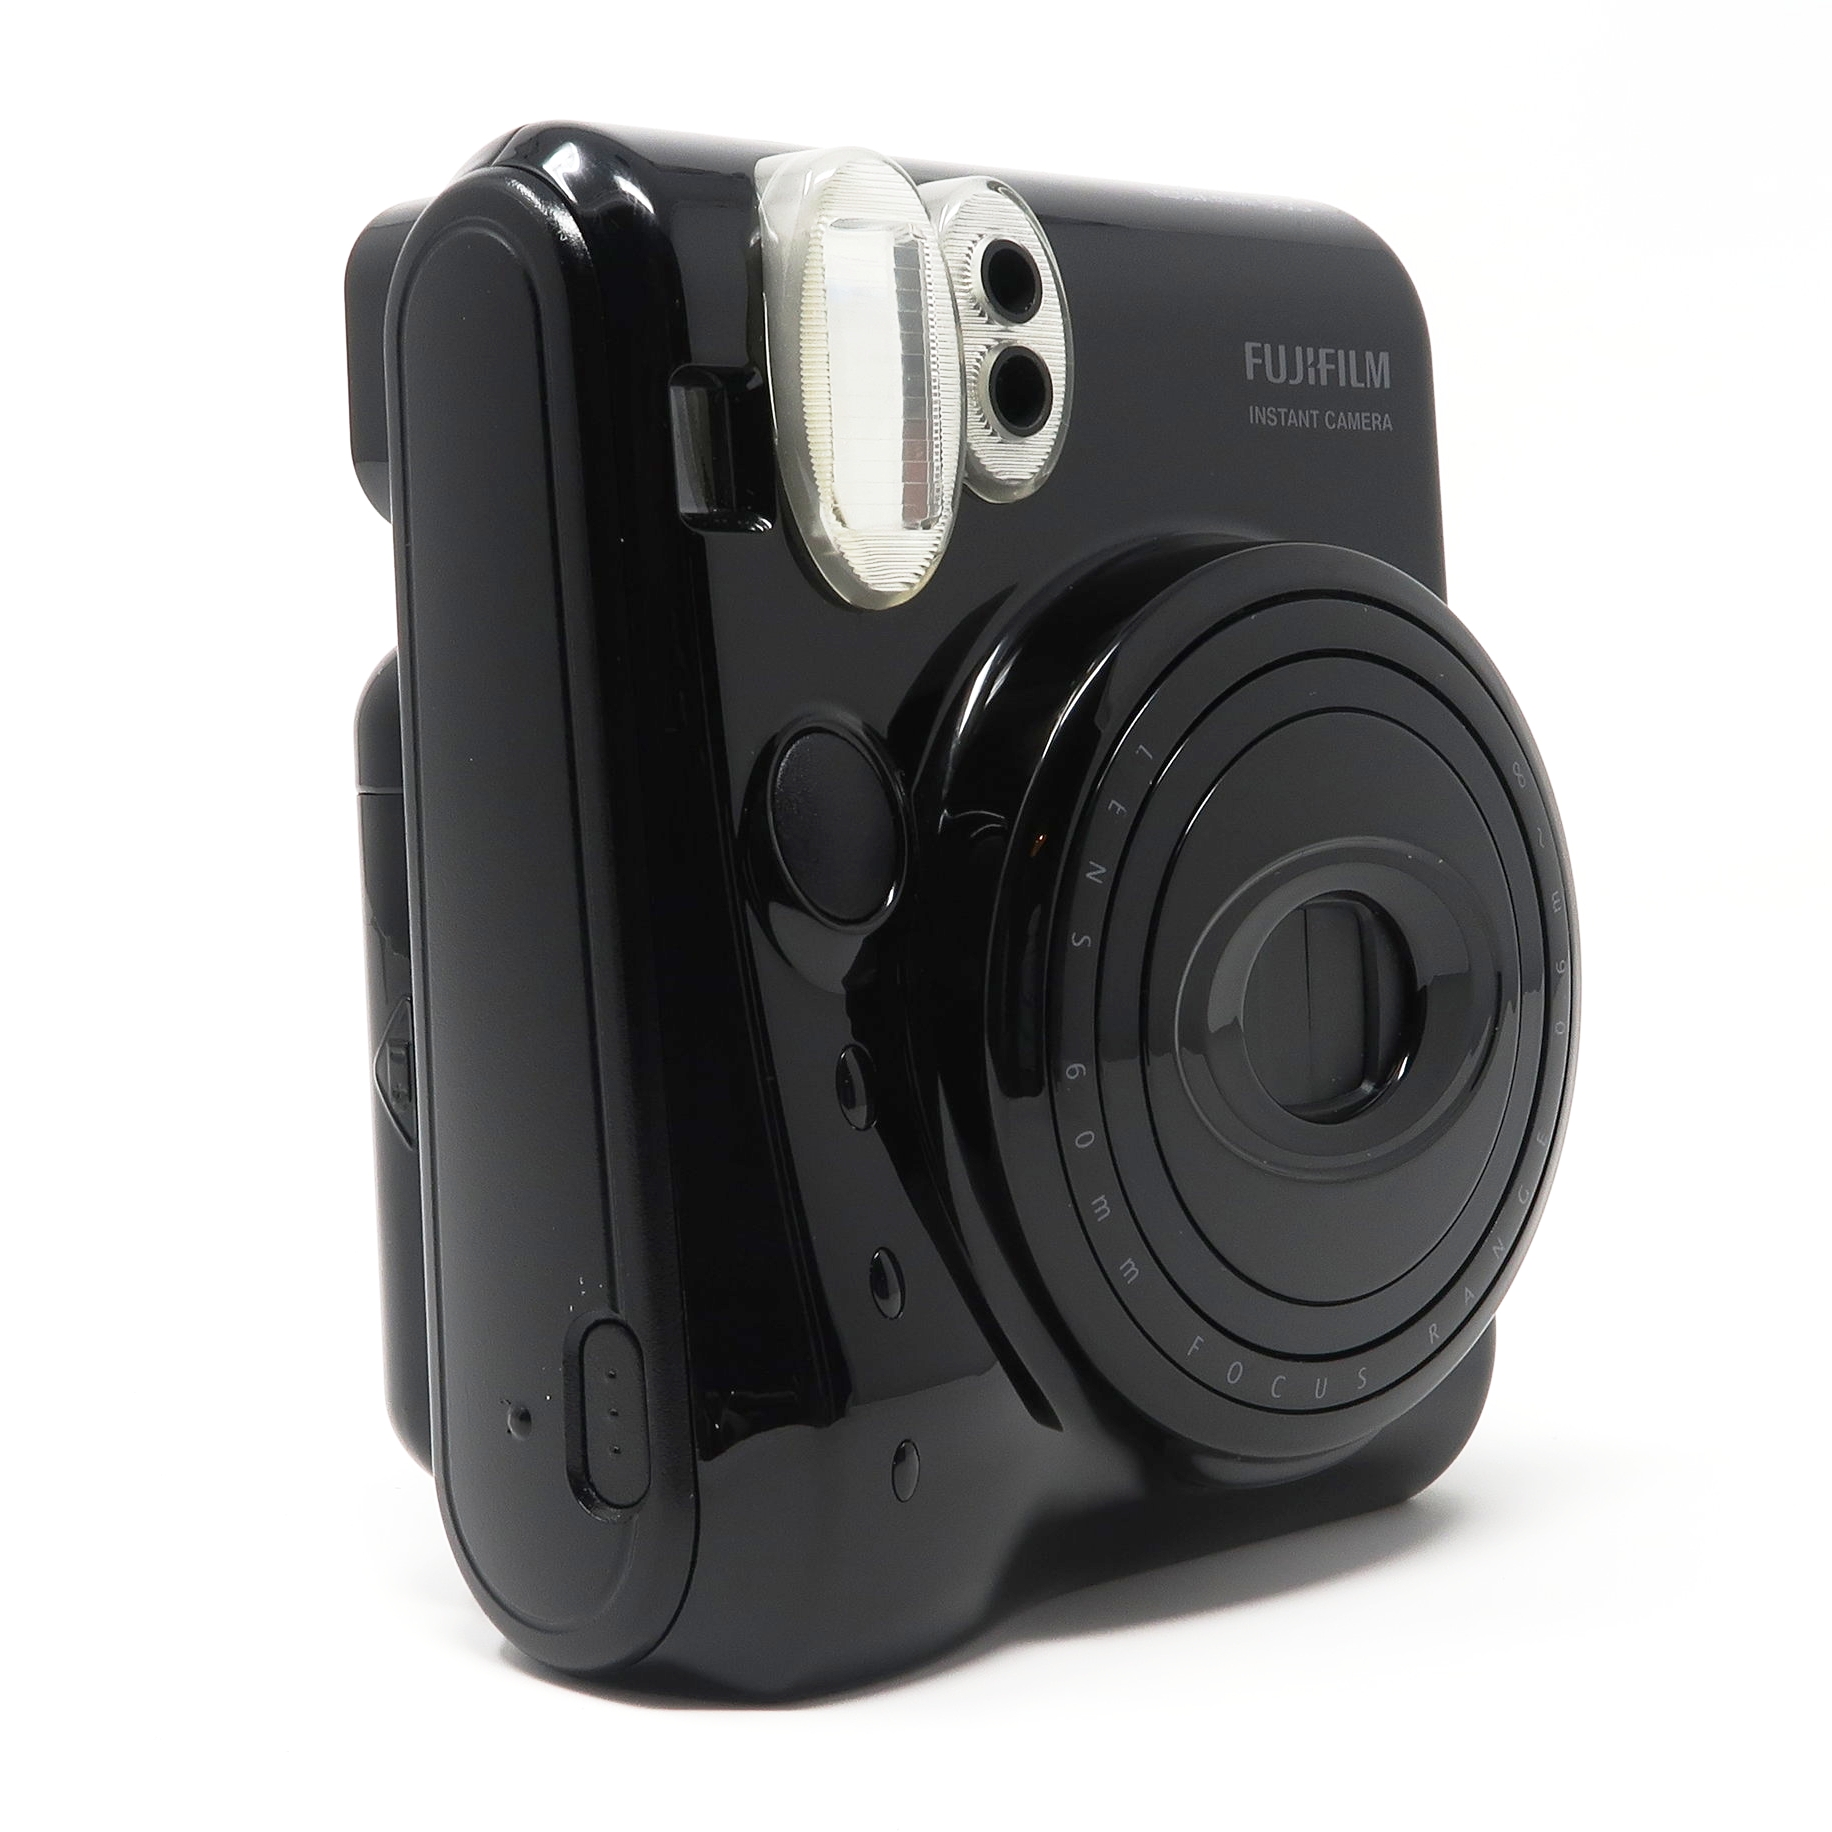
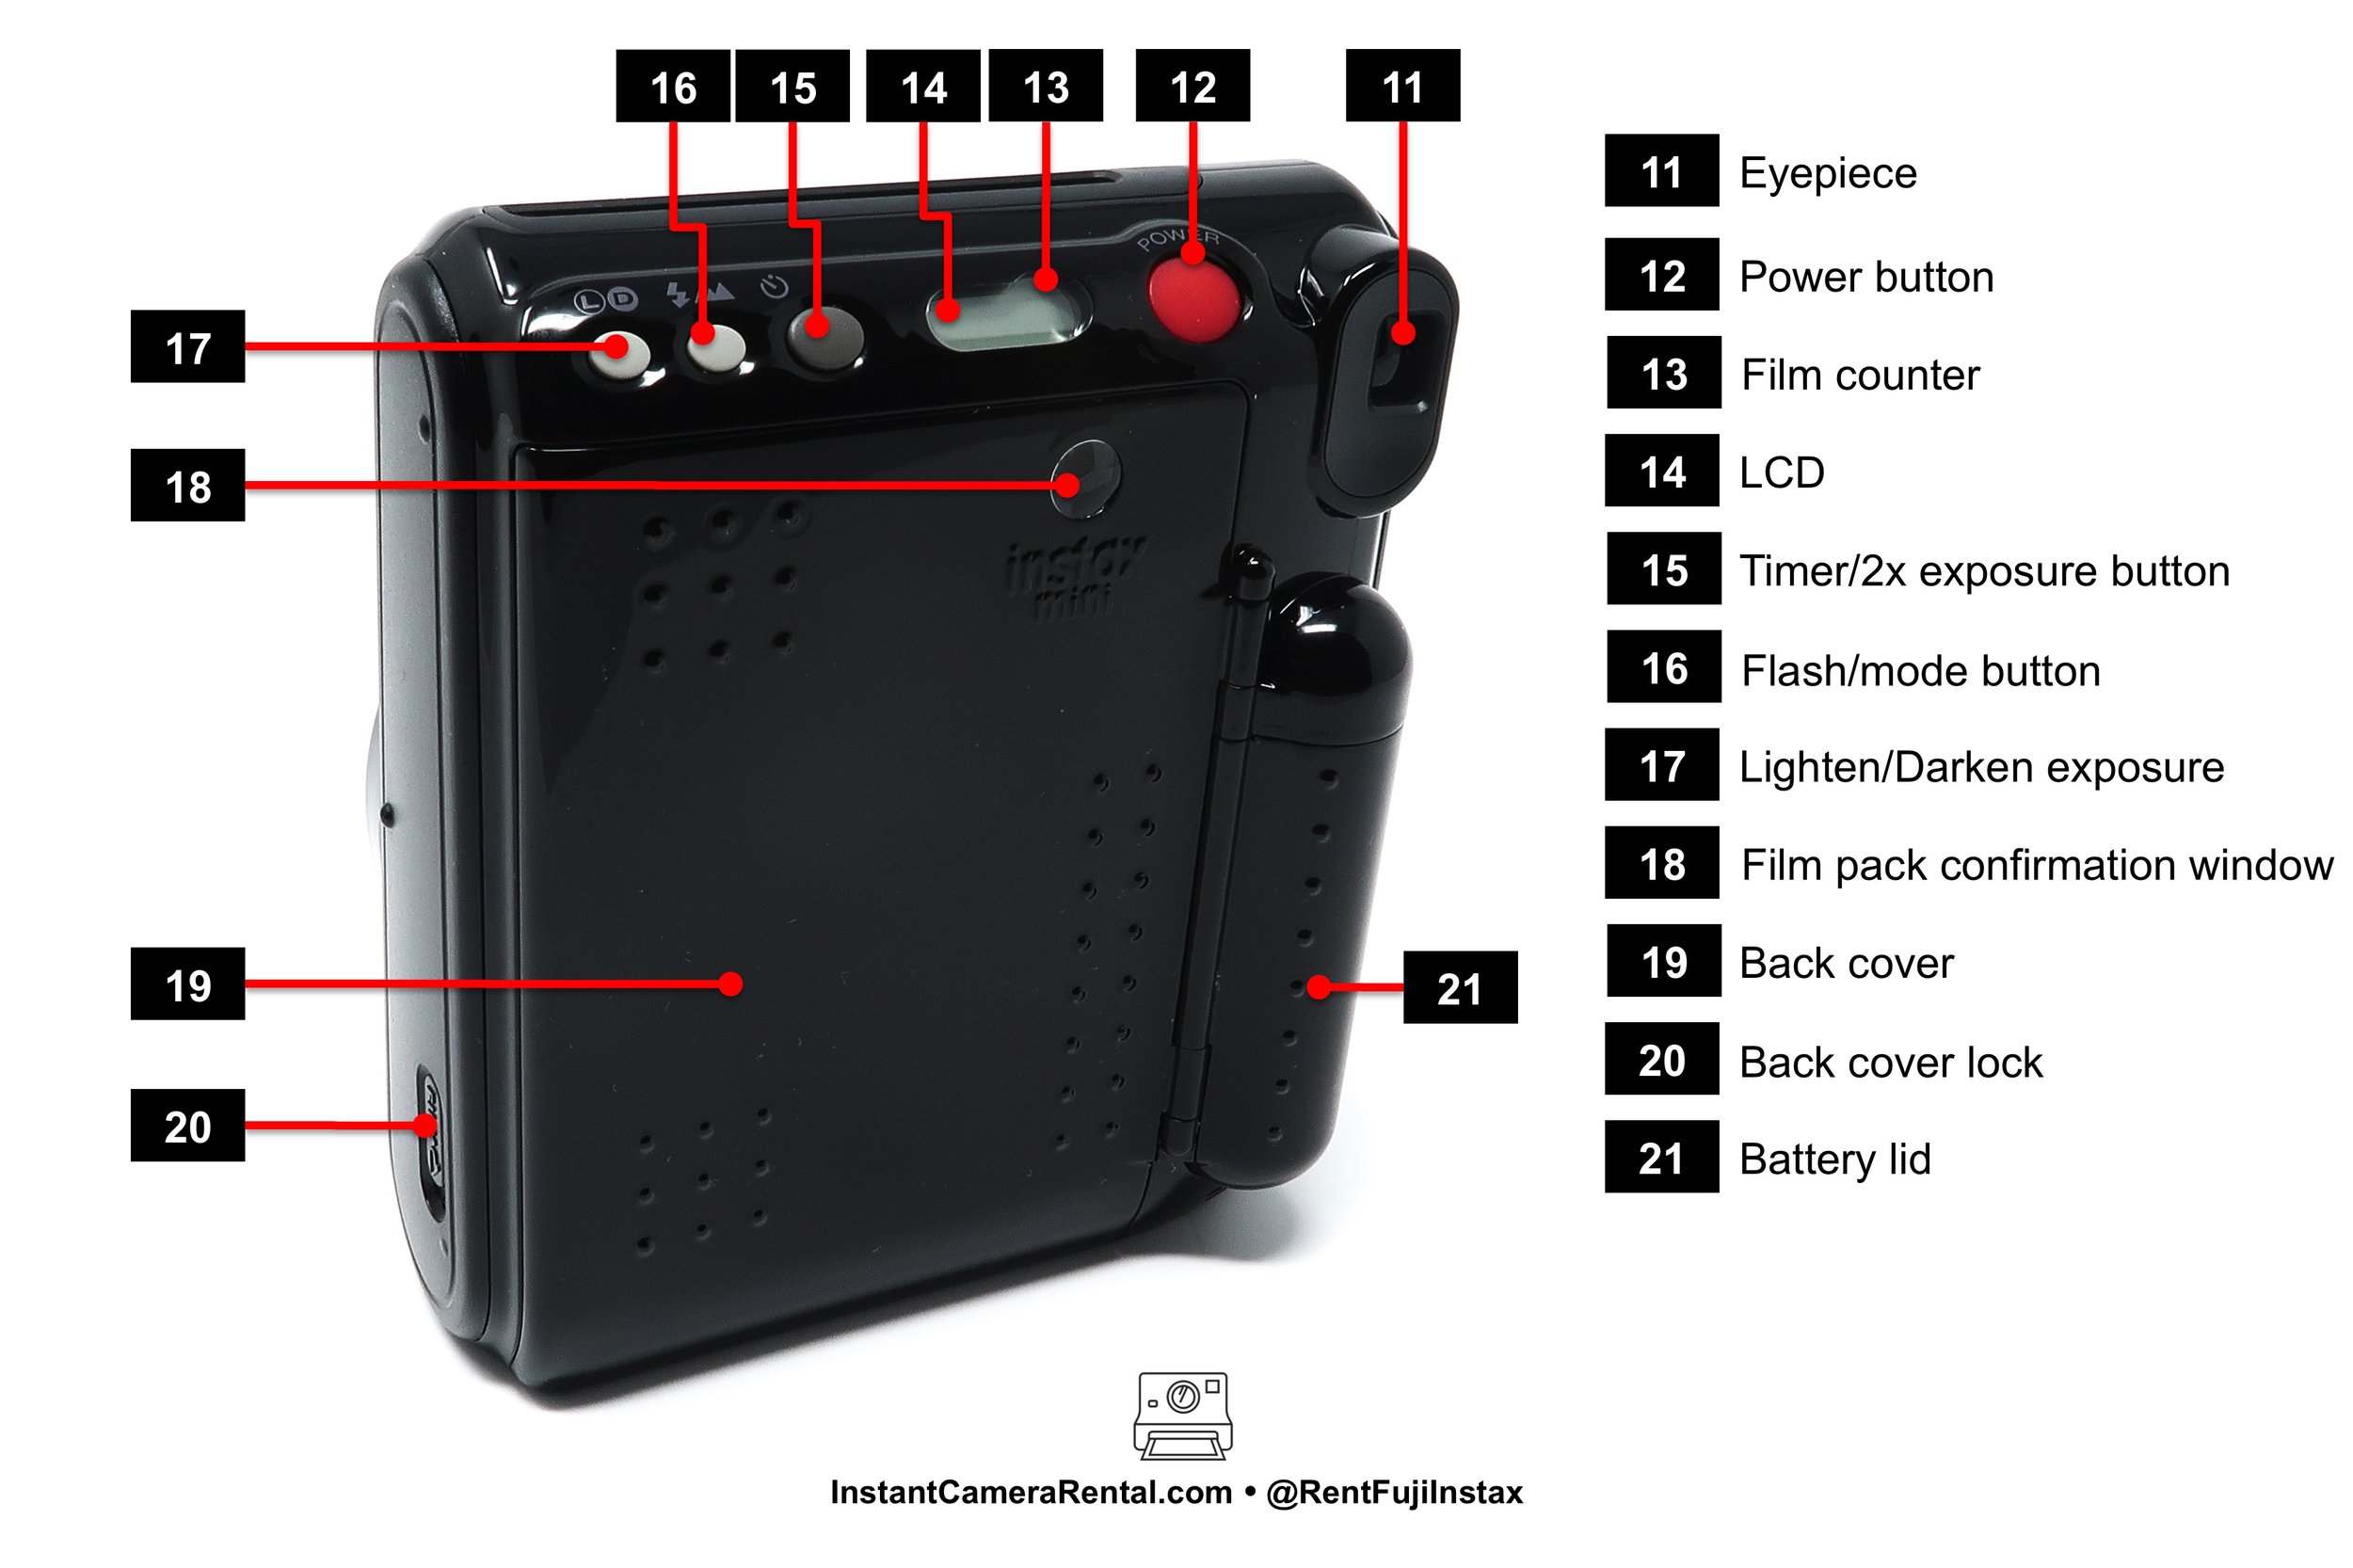
Fuji-Instax-Mini-50S-Review-Blog-Cover-Photo.jpg


FUJIFILM INSTAX MINI 50S FULL REVIEW

Review provided by Everything Instax

Welcome to EverythingInstax.com, we review all things Instax and today we will be reviewing the Fujifilm Instax Mini 50S.  

Overall the Mini 50S was one of our favorite Instax cameras.  It has recently been phased out by the Mini 70. We often group the Instax mini line of cameras into three (3) groups, entry-level (Mini 7S, Mini 8 and Mini 9), mid-level (Mini 25, Mini 50S, Mini 70) and premium (Mini 90).  At around $95USD the camera is priced in the mid range of the Instax family with the Mini 90 Neo Classic costing $125USD and the Mini 9, costing around $60USD. The Mini 50S comes in two (2) colors, Piano Black and Piano White. As the name suggest the camera uses the "mini" film format which produces a picture about the size of credit card.  Film can be purchased in 2-packs, 5-packs, 6-packs and 10-packs for around $6.00 per pack.  Further details on photo size and film development time can be found here.  The Mini 50S has many useful features including an ability to adjust the exposure, tripod mount, 10-sec timer and an LCD for knowing your settings and remaining number of photos. The Mini 50S uses two (2) disposable 3V CR2 disposable batteries which are good for about 300 photos.  This is about 3 times as many photos that the Mini 90 Neo Classic can take on a single charge of its Li-ion rechargable battery. A full review of battery types and battery life can be found on our blog.

WHAT'S IN THE BOX:

Fuji Instax Mini 50S, CR2 batteries, manuals x2, wrist strap, macro lens & macro lens case.

Fuji Instax Mini 50S, CR2 batteries, manuals x2, wrist strap, macro lens & macro lens case.

  • 1 Camera

  • 1 Wrist Strap

  • 2 CR2 3V Disposable Batteries

  • 1 Macro Lens with Case

  • Owners Manuals and Warranty

BATTERIES

The Mini 50S is powered by two (2) CR2 batteries which are good for roughly 300 photos (30 Packs). Buy these batteries in brick and mortar stores is expensive and can cost anywhere from $8-10 per battery.  Online you can find 2 packs for as low as $3.36 per battery  or 6 packs for as low as $2.29 per battery

SHOOTING MODES:

The Mini 50S has four (4) shooting modes: Auto, Landscape, Fill-In-Flash. and Macro.  While the Macro Mode is not defined on the LCD display it does come with a macro lens so we are considering it a mode. 

  • Auto Mode: Camera will automatically make decisions about shutter speed and flash on/off based on surrounding conditions. Auto mode is good for some environments and not so good for others. In situations where there are shadows or when the subject has a good amount of backlighting the camera does a poor job. Below is an image where a plant is situated in front of a window during the day. The plant is backlight. If you shot in Auto mode the flash does not fire and you end up with a dark subject. If you turn the flash on the plant is better exposed but could be a little overexposed. So in the this case the flash on with the exposure set to dark provides the best photo.

Fuji Instax Mini 50S photos taken in: Full Auto Mode (Left), Auto Mode with flash enabled (Middle) and Auto Mode with flash and dark exposure (Right).

Fuji Instax Mini 50S photos taken in: Full Auto Mode (Left), Auto Mode with flash enabled (Middle) and Auto Mode with flash and dark exposure (Right).

Shooting outside under overcast or cloudy conditions will result in O.K. photos. See below for an assortment of photos taken in Auto Mode. 

Fuji Instax Mini 50S photos all taken in Auto Mode. Pictures taken mid-day in overcast conditions.

Fuji Instax Mini 50S photos all taken in Auto Mode. Pictures taken mid-day in overcast conditions.

  • Landscape Mode: Designed for photos where the subject is greater then 3 meters (10 ft.) away.

Mini 50S photos taken in Landscape Mode with light (left top) , normal (right top) and dark (bottom) manual exposure settings in mid-day full sun conditions.

Mini 50S photos taken in Landscape Mode with light (left top) , normal (right top) and dark (bottom) manual exposure settings in mid-day full sun conditions.

We did notice that in landscape mode under mid-day overcast conditions that there was not a considerable difference in image quality.  Each of the scenes below was taken in Landscape Mode in the three (3) available manual exposure settings of light, normal and dark.  The only image which stands out slighlty is the lake image taken in dark manual exposure mode (bottom left).  

Fuji Instax Mini 50S photos taken in Landscape Mode mid-day overcast conditions in light, normal and dark manual exposure settings. Little discerable difference.

Fuji Instax Mini 50S photos taken in Landscape Mode mid-day overcast conditions in light, normal and dark manual exposure settings. Little discerable difference.

  • Macro Mode: The macro lens is provided with the camera as a separate accessory. And while clunky it does allow you to take improved pictures at close range. The recommended distance range is small a between 30 - 40 cm (11.80" - 15.75"). This is a very narrow range and is about the distance from you finger tips to just short of your elbow for many. The macro lens come with its own case and easily snaps into place. The case can easily attach to the wrist strap. While not extremely comfortable or secure it is a place to readily access the lens if you are not using a case. Fuji has largely moved away from this macro lens in favor of an camera solution that adjust the focus internally. There is no macro lens on the Mini 7S, Mini 8, Mini 70 (Macro Mode), Mini 90 (Macro Mode), Wide 210 or Wide 300. There is one for Mini 9 and Mini 25. The Mini 7S and 8 don't perform well under 0.6m (2 ft.) because of a lack of a specific macro mode or macro lens.

Fuji-Instax-Mini-50S-Macro-Lens.jpg

When taking a photo in Macro Mode with the Mini 50S and Mini 70 you have to be careful when composing your shot.  What you see in the viewfinder differs from what you actually capture on film. In order to center your subject you need to aim slightly up and to the right.  Below shows a picture of a stop sign.  The center photo was taken at 13" from the center focusing on the center of the 'O'. Note how the center of the 'O' is shifted up and to the right.  To center the 'O' you need to center your view finder slightly up and to the right. 

Fuji instax Mini 50S Photos. No macro lens (left) at 5 ft., macro lens center in the 'O' (middle), off center (right). Green dot notes focus point.

Fuji instax Mini 50S Photos. No macro lens (left) at 5 ft., macro lens center in the 'O' (middle), off center (right). Green dot notes focus point.

Below are examples of photos and the target spots. These samples were taking in a light box with manual exposure set to dark.  

Fuji Instax Mini 50S photos in Macro Mode with manual exposure set to dark at roughly 13" from the subject in a light box.

Fuji Instax Mini 50S photos in Macro Mode with manual exposure set to dark at roughly 13" from the subject in a light box.

With the Mini 50S you do have the ability to manually adjust the exposure either darker or lighter depending on the lighten.  You do not have the ability to turn the flash on/off.  The flash is automatic and will go off if the sensor does not feel it has enough light.  This is also true with the Mini 70.  Under some scenarios, like when you are photographing a shiny or reflective object, the flash can reduce the quality of photo.  The Mini 90 allows you to shoot in Macro Mode and turn the flash off manually.   

Photos taken with the Fuji Instax Mini 50S camera's macro lens from roughly 13" from the subject.

Photos taken with the Fuji Instax Mini 50S camera's macro lens from roughly 13" from the subject.

If you don't use the macro lens at distance within 2ft the results are blurry.  The photos below were all taken at the same distance (about 13").  A macro lens was not used on the first photo and the logos are noticeably blurry.  The middle and right photos were taken with the macro lens at both the normal and dark exposure.  The right photo showed the best results as the color of the balls are not as washed out.   

Fuji Instax Mini 50S photos at roughly 13" from the subject taken mid-day in overcast conditions . No macro lens (left), macro lens with normal exposure (middle). and macro lens with dark exposure setting (right).

Fuji Instax Mini 50S photos at roughly 13" from the subject taken mid-day in overcast conditions . No macro lens (left), macro lens with normal exposure (middle). and macro lens with dark exposure setting (right).

  • Fill-In-Flash:

The fill in flash can be enable through the button on the back of the camera.  It is effective up to a distance of  about 10 ft.  Good when subjects are against a bright or illumintaed background or in low light conditions.    

MANUAL EXPOSURE:

The ability to lighten and darken the exposure (+/- 2/3 EV) and turn the flash on are nice features.  This feature is really useful in situations were there is excessive brightness or darkness.  Below is picture of fire hydrant taking mid-day in slightly overcast conditions.  From left -to-right the camera settings are light exposure, normal exposure and dark exposure.    

Examples of pictures taken by an Instax 50S mid-day, full sun at 3 ft. from subject with light exposure, normal exposure and dark exposure.

Examples of pictures taken by an Instax 50S mid-day, full sun at 3 ft. from subject with light exposure, normal exposure and dark exposure.

Examples of pictures taken by an Instax 50S morning, slightly overcast at 20 ft. from subject with light exposure, normal exposure and dark exposure.

Examples of pictures taken by an Instax 50S morning, slightly overcast at 20 ft. from subject with light exposure, normal exposure and dark exposure.

Below is an example of a picture of a stop sign in full mid-day sunlight taken with a Mini 50S (dark exposure), Mini 70 (auto mode) and Mini 90 (dark exposure). Since the 70 has no manual exposure settings you are kind of stuck.  You can see the photo looks O.K. but is a little washed out.  The 50S photo is slightly under exposed and may have benefitted from not have the dark exposure setting enabled.  The photo taken with the Mini 90, on the same settings of the 50S, has the best exposure of the set.  

Examples of pictures taken by Fuji Instax Mini 50S (left), Mini 70 (center) and Mini 90 (right) cameras.

Examples of pictures taken by Fuji Instax Mini 50S (left), Mini 70 (center) and Mini 90 (right) cameras.

OTHER FEATURES:

Fujifilm Instax Mini 50S with 4" flexible tripod.

Fujifilm Instax Mini 50S with 4" flexible tripod.

The tripod mount and timer makes solo and group photos easier to execute.  The 10-second timer has the ability to take back-to-back photos.  If a tripod is essential then only the Mini 50S, Mini 70, Mini 90 and Wide 300 have tripod mounts.  Timers are also limited to to the Mini 50S, Mini 70 and Mini 90.  The wrist strap is not particularly useful but may provide extra security and grip in certain situations. For landscape oriented photos there is a dedicated shutter release on the side of the camera (see picture below).  Using it will ensure that you shoot the photo with the flash setup on top.  This dedicated shutter release is only available on the Mini 50S and Mini 90.  It is not available on the Mini 7S, Mini 8, Mini 9 or Mini 25.

Fuji Instax Mini 50S shutter release button specifically designed for landscape orientated photos.

Fuji Instax Mini 50S shutter release button specifically designed for landscape orientated photos.

Fuji Instax Mini 50S photo using landscape orientated shutter release mid-day, full sun, dark exposure mode.

Fuji Instax Mini 50S photo using landscape orientated shutter release mid-day, full sun, dark exposure mode.

Fuji Instax Mini 50S photo using landscape orientated shutter release morning, overcast sun, dark exposure mode.

Fuji Instax Mini 50S photo using landscape orientated shutter release morning, overcast sun, dark exposure mode.

NO SELFIE MIRROR:

While we did consider this a minor drawback.  We did not considering centering and composing selfies was difficult, especially with some practice.  In fact, under some shooting conditions you can see your reflection in the lens making the job even easier.  Nonetheless, below are 10 shots attmpeting to take selfies in various settings.  

PROBLEMS/ISSUES:

Extended testing on multiple cameras did reveal that the tab on the back cover which engages a switch has a tendency to break.  If this breaks the camera cannot take a picture.  

Fuji Instax Mini 50S unbroken tab.

Fuji Instax Mini 50S unbroken tab.

Fuji Instax Mini 50S broken tab.

Fuji Instax Mini 50S broken tab.


In addition, the confirmation window on the back cover telling you whether there is a film pack inside has a tendency to fall out due to either a poor or defective adhesive.  The camera will still function properly without this it is just unslightly and can allow debris to enter the film space.   

Fuji Instax Mini 50S Confirmation Window

Fuji Instax Mini 50S Confirmation Window

Compatioble glue that will not "fog" up clear plastic

Compatioble glue that will not "fog" up clear plastic

CASES:

Cases compatible with the Instax Mini cameras included the cases below from Evecase and Roocase.  Both of these are designed for GPS units and can be found in our store.  Each is made from well padded neoprene and also has a zipper pocket to store extra batteries, wrist straps, macro lens/case and other accessories. 

Cases compatible with the Instax Mini cameras included the above cases from Evecase and Roocase. Both of these are design for GPS units and can be found in the Misc. section of the Everything Instax store.

Cases compatible with the Instax Mini cameras included the above cases from Evecase and Roocase. Both of these are design for GPS units and can be found in the Misc. section of the Everything Instax store.

Instax Mini in a Roocase

Instax Mini in a Roocase

BASIC HOW TO:

BASIC ANATOMY:

Fuji-Instax-Mini-50S-Anatomy-Front.jpg
Fuji-Instax-Mini-50S-Anatomy-Back.jpg

Basic operation of the camera is simple:

1. Load the included 3V CR2 batteries into the rear of the camera.

Fuji-Instax-Mini-50S-Open-Back-Battery.jpg
Fuji-Instax-Mini-50S-Load-Battery.JPG

2. Load a new pack of film (10 exposures) by pressing down on the release button located on the side of the camera. 

Tab on the back cover that has a tendency to break is noted by the red dot.

Tab on the back cover that has a tendency to break is noted by the red dot.

3. Remove a pack of film from its protective foil wrapper and align the yellow tabs on the film pack and inside the camera.  Insert the film cartridge and close the door. 

Confirmation window that has a tendency to fall out is noted by the red dot. The switch which is not engaged when the tab on the cover is broken (see above) is noted by a green dot.

Confirmation window that has a tendency to fall out is noted by the red dot. The switch which is not engaged when the tab on the cover is broken (see above) is noted by a green dot.

4. Press the red power button on the rear of the camera.  The LCD indicator light will now read "-".

Fuji-Instax-Mini-50S-Power-On.JPG


5. You will need to eject the protective blank film insert to begin taking actual photos.  You do this the same way you take an actual photo by pressing the shutter release button located in the front of the camera.  

6. The LCD should now read 10, because you have 10 photos remaining.  Each subsequent photo you take will reduce the value by one until you reach "0" which indicates you need to load another film pack.

Fuji-Instax-Mini-50S-Eject-Blank-1.jpg


7.  The camera is now ready to use.  The standard settings work well for most situations but you may want to utilize the various features to better suit your specific situation.

8. Options include but are not limited to:

  • Take a photo in landscape as opposed to the traditional portrait layout

  • Use the 10-second timer option, this can be combined with a tripod

  • Use the 10-second timer option x2, where 2 photos are taken 10 seconds apart

  • Make a photos exposure darker, useful in bright sunny settings

SPECIFICATIONS:

  • Film: Fujifilm Instax Mini Format

  • Picture Size: 62 x 46 mm (see here for more details)

  • Lens: Move in/out type lens, 2 components, 2 elements, f=60mm, 1:12.7

  • Viewfinder: Real image finder, 0.37x , with target spot

  • Focusing: Motor-driven 2-range switching: 0.6 - 3m/3m - ∞, Shooting range: 0.6m - ∞, Landscape Mode (3m - ∞)

  • Shutter Release: Programmed electronic shutter release, 1/3 - 1/400 sec. shutter speeds,
    2 shutter buttons (vertical shooting/horizontal shooting)

  • Exposure Control: Automatic, Interlocking range (ISO 800): LV5.0 - LV15.5, Exposure compensation (Lighten-Darken Control): ± 2/3EV

  • Film Feeding Out: Automatic

  • Flash: Built-in, Automatic electronic flash, Auto mode (Intelligent Flash for Brighter Backgrounds), Fill-in Flash Mode,0.2 - 5sec. recycle time (when new batteries are used), with flash charging lamp (red), effective flash lamp range: 0.6 - 3 m

  • Self-timer: Electronically controlled, approx. 10 second delay, Continuous shooting mode, can be stopped mid-run

  • Liquid Crystal Display: Exposure counter (number of unexposed films), Landscape Mode, Lighten-Darken Control, Fill-in Flash Mode,Self-timer Mode (1 frame/2 frames continuous shooting)

  • Power Supply: Two CR2/DL CR2 lithium batteries, Capacity: 30 film packs *Based on our test conditions

  • Others: With film pack confirmation window, tripod socket, stylish illumination indicators

  • Dimensions and Weight: 112.0 x 96.5 x 49.5 mm(W x H x D)/275g (without batteries, strap and film pack)

Ethics Statement: I purchase all products reviewed on EverythingInstax.com this includes the Fujifilm Instax Mini 70 reviewed here. I have not been paid or compensated to write this or any review on this site. The reviews are based on my opinions often times backed up with examples. My opinions are based on nearly 10 years of hands on field tested experience with Instax products and accessories. Within the article there are links to products. We do make a small commission of for each sale which help keep the content on this site update to date and relevant. Please consider using our links. If you have specific comments, questions or critiques of my reviews please contact me here.
Cheers,
Matt Skolikas
Owner - www.EverythingInstax.com & www.InstantCameraRental.com